
Grace Notes


Showing posts with label fun. Show all posts
Showing posts with label fun. Show all posts
February 21, 2024
FAMILY SKATE - Two Christmas Card Designs
Family Skating Silhouettes
This Christmas, I decided to design something more NON-traditional, and yet, it IS traditional. What do I mean?
I came across silhouettes of people skating that just happen to look EXACTLY like my children! This technique is not your typical Christmas design. Yet, the designs themselves are nostalgic for me.
A Swiss-like Scene

Daughter and Son-in-Law
My daughter and son-in-law love to travel. One of their favourite places is Switzerland. They also love to get out in the fresh air and go for walks, no matter if it's winter or not.
I designed this card, keeping in mind their love for Swiss home architecture, mountainous terrain (hills, in this case) and big beautiful pine trees. The couple skating on this card look exactly like them!

Daughter, Son-in-Law & Granddaughter
This little family is perfect for my other daughter's little family. They were thrilled with it and told me: "It' just like US! How did you do that?"
It's like I always say: Cardmaking has to be personal to the recipients, or why bother! This year, I was delighted with how these two cards turned out.

January 01, 2012
A Christmas Day Birthday
This is a duplicate post as it is both a birthday card and a Christmas theme card. You can read all the details on how I made it on my blog, HERE.

This will be my last Christmas post for 2011. However, I will continue to add Christmas posts to this blog throughout the year, just not as often.

This will be my last Christmas post for 2011. However, I will continue to add Christmas posts to this blog throughout the year, just not as often.
I'd like to take this opportunity to wish you all a
Happy and Blessed New Year.
Welcome 2012!
~ Grace
December 21, 2011
Reindeer Crossing Gift Bag & Tag
Dress up a plain white bag with this cute little reindeer. Don't you just love the string of Christmas lights woven through his antlers?


This combo made up fairly quickly.
The adorable reindeer and tag are from Winter Frolic.
I created the reindeer's spots, nose and eye using ProMarkers rather than fussing with tiny bits of paper. I like the more subtle shading.
If time had permitted, I would've made up several more bags and tags like this one. There are so many cute designs with coordinating phrases on the Winter Frolic cartridge.

December 09, 2011
Free Christmas Graphics
Here's a video overview of some of my downloadable Christmas Graphics, available on the Downloads tab.
November 21, 2011
Quick Snowman Card
EASY and Cute

I rediscovered this little guy on the Stretch Your Imagination cartridge. It's a very simple process to follow the example in the front of the SYI handbook. It's an older design but I still think it's pretty cute. Be sure to check out my latest DOWNLOADS... FAMILY TAGS.
Snowmen Always Welcome!
 |
| Snow People Family |
Here are some of my other Snowmen Christmas cards. SO many cute styles to choose from.
Cartridge used: Winter Woodland
See details on the post Snowman Family


Chubby Snowman Christmas Card
See details on the post: Chubby Snowman Card
Cartridge used: Christmas Cheer

~ Grace
November 05, 2011
SNOWMAN FAMILY
There is nothing more fun than the whole family going tobogganing. This snowman family is out for a fun day on the slopes.
I created this card for a family of three, and designed the snowmen to mimic the style of each family member. I love the hat on the Dad. It's exactly what he would wear! And the sweet little Mom, standing quietly by while Dad pulls baby along on the sled, is SO like her (not complaining that her toes are getting cold).
The pictures pretty well tell the story. This card is a 5x7 because I needed lots of room for everything. The snowy hills are hand-cut from embossed swirly cardstock. Rather than explain every single detail that went into this card, I will let you figure it out from the pictures.
I will say though, I gave the characters at least 3 layers. The sled has 2 layers. And please notice the snowmen's noses.They are totally carrot-like only better. I glammed them up with some gold ridges, first drawn with pencil and painted over top. I could NOT stop smiling as these characters came to life.

I prepared the verse on my computer and printed it on white cardstock. The top panel has the same snowflake background as on the card front. I used another piece to mat the verse on the bottom. Before gluing down the mat and verse, I stamped snowflakes all over the base and added 3 silver snowflakes for interest.
It's at times like this, when I am designing cards that are personal to the recipients that I have the most fun. I couldn't wait for them to open their card. I knew they'd love it. Exchanging personal cards has now become one of our family's yearly Christmas traditions, and it is SO much better when they are hand-made.
November 04, 2011
Easy Personalized Card

When you're short on time, let the paper do your design work. For this card, I matched the coral-red in the paper to a plain cardstock.
The toques and mittens were fun to replicate by cutting them out of this bright cardstock. For fun, I added glitter to the snowball and a real pom-pom to the toque.
"Merry Christmas" is from Joys of the Season. The name is cut from Alphalicious letters and shadowed in black. The banner background was very easy. I just cut a rectangle of the coral-red, and punched the corners. Then I inked around in black and attached the finished banner to the card bottom with brads. Done!
November 01, 2011
Cheery Christmas Tags
BRING ON CHRISTMAS!

I'm getting a start on my Christmas tags with a variety of themes, all done in the traditional colours of Red, White and Green. My mind was swimming with ideas and I could barely focus on just a few ideas when I finally came up with these. More are on the way.
I Love Skates

Ever since I was a girl I have always loved white figure skates. I used to be quite a good skater, and would stay out in the freezing cold, skating for hours until I could no longer feel my toes or my nose.
What does that have to do with cards? Only that who we are comes out in the things we create.

These skates are cut from two different cartridges: Winter Woodland and Joys of the Season. All shapes are cut at size 3. Notice the jingle bell on the red and white tag? I ALWAYS used to put jingle bells on the toes of my skates. It was so much fun to hear them jingling as I skated around the outdoor rink. Skates are so bare without them!

Holly and Vellum
There always needs to be a touch of holly. This little card is 3x3". The window is backed with swirly vellum.
This was cut using the card feature with another layer for green leaves. Then I added some coarse green glitter to the edges and red rhinestones for the berries. I used a small stamp for the "Fa la la's" and added a red ribbon for attaching to a gift.

Juggling Snowmen
This is such a cute cut from the JOTS cartridge. I used the positive and negative cuts from the snowmen and it gave me two tags. On the green tag, the ornament top is painted with MS silver paint marker. You can see the reverse one on the left shows a bit of the silver paint around the cutout stars. I call it "star glow".
A Tag For Every Bag
Gold Stars


 I loved this bag with its penguin carolers. And I was so excited to find the perfect penguin for a matching tag on the Christmas Cheer cartridge.
 The size of the penguin is about 2-1/2.


 I cut a square of blue for the front.
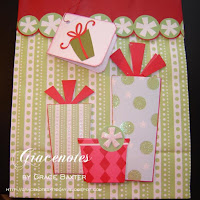

If you love the designer look of gift tags that match their bags, create your own using your Cricut and a little imagination. Last year, I bought some nice gift bags, but their tags were scimpy little squares of paper, so I made all new tags and cards.

First up... Gold Stars. This gift card allows plenty of room inside for your "To" and "From". I cut the card from white using Joys of the Season.
I then painted over the stars using MS gold glitter paint. I like the look of a frosty window, and I didn't want the writing inside to show through too easily. So, to make the cutouts less open I added a small piece of vellum behind the window.

On the inside, I punched a small hole for the gold cord. The finished gift card ended up looking far more elegant than I thought it would!
Penguin
 I loved this bag with its penguin carolers. And I was so excited to find the perfect penguin for a matching tag on the Christmas Cheer cartridge.
I know this cartridge is an older one but it still has some terrific shapes on it. Actually, even though there have been many Christmas carts since this earlier one, Christmas Cheer can't be beat.
 The size of the penguin is about 2-1/2.
His feet and beak are cut from white and painted with gold glitter paint.
The eyes of the penguin are actually cut out, so I decided to shadow the whole penguin in white. That way, I could add blue eyes (a small dot of blue MS glitter paint against the white).
This little guy sure made the happy recipient smile.
Fashion Boot

I picked up this gift bag especially for my daughter. She's a shoe lover. I didn't know what kind of tag I'd be able to find or make, at the time.
Several weeks later, I came across a pad of sticky notes that were the exact same boot design! It was one of those "meant to be" things.
I'm sorry I don't remember which cartridge I used for the "to" and "from" but there are many that have these cuts.

Closeup of tag.
Ornament

This bag uses very non-traditional colours so it was good that I was able to create a gift card that matched.
The blue is almost a baby blue. I started with a 6" x 3" piece of white cardstock, folded in half for a 3x3 card.
 I cut a square of blue for the front.
The ornament is from Christmas Cheer cut at about 2-1/2".
For this one I decided to use an eyelet for the cord to go through. It looks a lot more polished than to just have an empty hole.
And to make the tag match with the others on the bag, I added some glitter around the ornament.
Gift

These little cards are so simple and quick to make. When I look through my cartridges I see endless possibilities in Christmas designs.
Many cartridges have various gifts. This one is from Christmas Cheer because it best matches the gifts on the bag.

I rounded off the corners using a punch. I think this one is from Creative Memories.
Once again the card size is 3"x3". I inked around the edges in red to mimic the other gifts.
A punched hole and piece of red cording finish it off.
A-Caroling We Will Go
Tri-Shutter Card with Music Theme

These happy little carolers are all decked out in their winter finest. At first glance you might think this card may be too difficult or time-consuming. Actually, it is neither!
What MAKES this card is the fabulous cardstock. You have to start with the best. I love The Winter Wonder Stack from DCWV. (No, they aren't paying me to say that.) The crisp stock is the perfect weight, and I can't even tell you how hard it was deciding which designs to use. They are all wonderful -- some smooth, some shiny or glittered.

Winter Frolic is the perfect cartridge to pair up with these papers. I usually search through my cartridges and choose cuts from a few different ones. But this time I stuck with just Winter Frolic. It was everything I needed!

Begin with a tri-shitter card. Directions are available on Youtube. Just search for "tri-shutter card". I recommend testing the cuts on cheap plain paper if you've never done one of these before. But seriously, it's very easy. I like to add a personalized message, prepared on my computer and placed on the back of the card.
Happy Cardmaking!

December 18, 2009
Chubby Snowman Card
Glammed Up Snowman
I enjoyed making this little winter scene featuring a rolly-polly snowman. The snow layer is cut from thin, sparkled felt. The snowman and broom were from Christmas Cheer.
Snowflake sky background paper is always useful in making Christmas cards and tags. I like this one for the gradient shades of blue.
The phrase Merry Christmas was cut from Beyond Birthdays. For the face of the snowman, I had to cut a blackout layer in black so that his eyes and mouth and buttons would show up black.
The broom adds a touch of whimsy to finish off the front.


HO HO HO Card
Santa's Old-Fashioned Hat

This card was fairly simple to whip up, yet it looks quite elegant and fun.
I used the Christmas Cheer cartridge for this one. The hat's fringe and pom-pom are layered several times, then popped and sparkled with lots of glitter.
Vintage Colours
I used vintages shades of red and green. The cardstock in both colours has some distressing. Click the pic to view close-up.
Also, I inked the edges in both red and metallic gold around all sides, inside and out. All white parts are sparkled up with glitter. When done, the whole thing looked quite striking.


Subscribe to:
Posts
(Atom)
About Me

Subscribe To


 Posts
All Comments
Posts
All Comments