
Grace Notes


Showing posts with label Tags. Show all posts
Showing posts with label Tags. Show all posts
December 22, 2017
2-Minute TAGS
Gift Tags in a Flash
Here is the quickest way to make pretty Christmas tags for your gifts.Start with a package or two of gift tag stickers. I bought mine from Joanne, on sale. Choose the red and green combo, gold and silver, or blue with silver. I like a variety to go with any bag or wrap.

Gift tag stickers are, when stuck directly on a gift -- flimsy and ordinary. They also get thrown out with the ripped off wrappings. With my beefed-up tags, they can be used every year! Just save them after all the gifts are opened.
Tags From Scraps
 It's a great way to use scraps of foil cardstock, which we know can be pricey. I also used regular matte red and green.
Punch the corners and punch a small hole for ribbon or cording to go through. I always have red, green, gold and silver cording on hand for Christmas tags.
I also punched some tiny notes from silver CS to use either as confetti or to glue to other tags. I like the added gleam. Foil tags give sparkle on the gifts when the tree lights shine on them.
 |
| Cutting Tags from Shimmer and Foil Cardstock Scraps |
Have fun making these easy, pretty gift tags!

November 21, 2014
Silent Night Gift Tag - Version 2
Hand Painted Deer

At first glance you might think this tag is exactly like the first one. Here's a link to that posting, in case you missed it. Silent Night Gift Tag #4
The overall design is similar but the ribbon, star and deer are different. To me, this little guy looks like a young buck because of the size of his antlers.
The overall design is similar but the ribbon, star and deer are different. To me, this little guy looks like a young buck because of the size of his antlers.
Deer

Sometimes cardstock does not always do well when cutting fine details with the Cricut.
For this tag, the deer and trees were made this way. I am not exactly an artist so I have to rely on my imagination in deciding on the most realistic colours to paint them. As always, I use my ProMarkers for this job.
The deer is from Winter Wonderland cartridge.
Layers
Lots of layers do the trick in giving these tags dimension and life. From front to back there are 7 layers. I wish the camera would capture the sparkle of the snow better. The following pic illustrates the layers.

Cartridges Used
Library Fonts - 'Silent Night' phraseWinter Frolic - tag shape
Winter Woodland - trees
Winter Wonderland - deer
Okay, that's it for the Silent Night tags. I'd better get busy making the next ones I have in mind. SO many choices... so little time!


November 19, 2014
SILENT NIGHT ~ Gift Tag #4
All Is Calm, All Is Bright

I love the Christmas carol, 'Silent Night'. When we think about 'night' we don't usually associate it with being bright. But with a full moon, or an amazingly bright STAR lighting up the fields, it most certainly would be bright!
That thought was the inspiration for my Silent Night tag.
I designed this one with a particular gentleman in mind. I know he will love the handsome buck in the forefront of the scene.

As with the others in this series, this tag is BIG, measuring 4-1/2"w x 5-1/2"h.
The pic at left illustrates the large size, spanning my hand.
Details

Background:
I cut the snowy hills freehand and sparkled them up with glitter. For the night sky, I used white gel pen to add snow. If you look closely, you'll see one bright (crystal) star in the "Silent Night" phrase.
Evergreen Trees:
Trees are cut from white cardstock, then painted with ProMarkers. I wanted the trees to be heavy with snow. I love how they turned out. Trees are 2 sizes: some are 1.78w x 1.37h. Others are 2.17w x 1.67h.Silent Night Phrase:
I chose to design my own phrase rather than use one from a cartridge. Sometimes those are too flimsy and don't cut well. The phrase is cut from silver cardstock.
Cartridges Used
Library Fonts - "Silent Night" phrase
Winter Frolic - tag shape
Winter Woodland - trees
Winter Wonderland - the deer
As with the other large tags, I am making two of each design. Can't wait to see reactions from the recipients. Such fun!
November 17, 2014
AWAY IN A MANGER - tag
Featuring the Christmas Carol

The hardest part of this tag was designing the music used as a background in the oval. If you are not familiar with PhotoShop, you can still find the music online and just use a portion of it for your backdrop.
For mine, I worked with the entire music score, cleaned it up to remove guitar chords, changed line spacing, and changed the text to print in brown.
I had to size it down, import it into Word which gave me 4 per page; enough to make a few more of this card.

I wanted to keep the colours rather muted looking and simple. The base tag colour is actually a loden green, not brown. Again, these tags are LARGE, sized at 6"h by 3-1/2"w.
Details
Sizes: Tag size 5-1/2"h, shadow 6"h
Ovals: 2.56w x 3.8h
Oval shadows: 2.71w x 4.02h
Manger & Baby Jesus: 2.1w x 2.79h
Cartridges Used
Elegant Edges - Tag 1 shape
Winter Frolic - Tag 2 shape, manger, star and Baby Jesus
These tags were so much fun to make. If you have any questions, I'd be happy to answer them.
November 15, 2014
Get Your JINGLE On!
Winter Wonderland Cartridge
My newest addition to my cartridge family is the Winter Wonderland cart designed by Anna Griffith. I wasn't sure whether I would like the scaled down book and lack of an overlay. But with my Gypsy, it all works well.
These tags are a chubby size: 3-3/4"w x 5-1/2" h.
3 In 1 Tags
My idea was to design a 3-in1 tag that serves as a gift embellishment, "to and from" tag, and a bow. No other decoration is required!
Cartridges Used
Winter Wonderland - Jingle
Winter Frolic - Tag
November 14, 2014
JUMBO TAGS!
How Big is BIG?
When it comes to beautiful tags, those skimpy ones you see in store packages just don't cut it. At least, not when you own a Cricut! Actually, I did not use my Cricut for this tag, but you will see some new posts coming that definitely make use of that tool.
Here is the first in a series of this year's Jumbo Tags.

This tag is suitable for those long packages. It all starts with the graphic I created a couple of years ago. It still like it!
Hint: This graphic is still available on my free downloads page at It's All About Christmas.

The tag measures 7" x 2-1/2" excluding ribbon. It would also be a fun book marker to include with the book you're giving that special book lover on your list.
Sneak Peek
You will want to check in tomorrow to see my next jumbo tag. Here's a sneak peak:

STAY TUNED!

December 17, 2013
Special Gift Tags
For the Girls - Beautiful skater tag
It's fun to make unique tags for that extra large gift, or for the gift that is going to bring the most excitement and joy to the recipient.
For the girls on your list... young and old.
Skater

The gift wrap used is actually very shiny.
I Cut a pretty frame out of glittery aqua cardstock (pic doesn't do it justice). Frame size is 5-1/2".
The skater and all her layers are cut at 4 inches. Skater is from Winter Woodland.
Dress and Skates
The dress is cut from sparkly dotted cardstock from DCWV Cherry Limeade stack. The pic doesn't show the raised shine of the skater's dress.
The trim layer pieces are plain white cardstock, glittered with sparkle dust.
Skates are plain white cardstock with silver glitter added to the blades. Isn't she lovely!
For the Boys

The young men on my list are actually grown boys. This tag is going to my son-in-law who enjoys skiing. For extra fun, I added the North Pole sign to the top of the mountain.
Ski hills are cut at 5-1/2 inches. I cut all the layers shown in the handbook. Then I ran the large hill through my Cuttlebug with the Swiss Dot folder. The two smaller hills only needed some soft inking around the edges using light aqua.
The snowy lower panel is just a piece I cut freehand and rounded the corners. Then I added swooshes and mounds using aqua ink. For sparkle and dimension I rubbed Twinkles Writer Glitter Paint over the inked areas, and set the piece aside to dry.
Trees on the mountain tops are painted with my Pro Markers.
For the skis, I used royal blue glitter cardstock with plain black bindings.
The ski poles are cut from foil cardstock.
Cartridges Used
Elegant Edges - Frame for skater tag
Winter Woodland - Skater, skis and poles
Winter Woodland - Skater, skis and poles
Winter Frolic - Hills and North Pole sign
December 21, 2011
Reindeer Crossing Gift Bag & Tag
Dress up a plain white bag with this cute little reindeer. Don't you just love the string of Christmas lights woven through his antlers?


This combo made up fairly quickly.
The adorable reindeer and tag are from Winter Frolic.
I created the reindeer's spots, nose and eye using ProMarkers rather than fussing with tiny bits of paper. I like the more subtle shading.
If time had permitted, I would've made up several more bags and tags like this one. There are so many cute designs with coordinating phrases on the Winter Frolic cartridge.

December 20, 2011
Large Sheep Tag
Nativity Sheep make a fresh theme for kids' gift tags.
You wanna talk about FUN? When you can't find a store-bought tag to match your paper... and usually you can't, I prefer making one. Go with the theme of the paper.

My little grandson, (not quite 3) is the recipient of this gift. I didn't have any Santa or snowman paper, so in order to make it fun and youthful, this tag features two sheep taken from the nativity theme in the paper.
Cut at 3" high, it measures 5-1/2" wide. The generous size of this tag provides plenty of room to write the "to" and "from" on the back. I'm sure my little grandson will love it.
Now... on with my gift wrapping!

Grace
November 01, 2011
A Tag For Every Bag
Gold Stars


 I loved this bag with its penguin carolers. And I was so excited to find the perfect penguin for a matching tag on the Christmas Cheer cartridge.
 The size of the penguin is about 2-1/2.


 I cut a square of blue for the front.
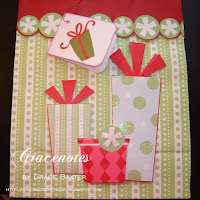

If you love the designer look of gift tags that match their bags, create your own using your Cricut and a little imagination. Last year, I bought some nice gift bags, but their tags were scimpy little squares of paper, so I made all new tags and cards.

First up... Gold Stars. This gift card allows plenty of room inside for your "To" and "From". I cut the card from white using Joys of the Season.
I then painted over the stars using MS gold glitter paint. I like the look of a frosty window, and I didn't want the writing inside to show through too easily. So, to make the cutouts less open I added a small piece of vellum behind the window.

On the inside, I punched a small hole for the gold cord. The finished gift card ended up looking far more elegant than I thought it would!
Penguin
 I loved this bag with its penguin carolers. And I was so excited to find the perfect penguin for a matching tag on the Christmas Cheer cartridge.
I know this cartridge is an older one but it still has some terrific shapes on it. Actually, even though there have been many Christmas carts since this earlier one, Christmas Cheer can't be beat.
 The size of the penguin is about 2-1/2.
His feet and beak are cut from white and painted with gold glitter paint.
The eyes of the penguin are actually cut out, so I decided to shadow the whole penguin in white. That way, I could add blue eyes (a small dot of blue MS glitter paint against the white).
This little guy sure made the happy recipient smile.
Fashion Boot

I picked up this gift bag especially for my daughter. She's a shoe lover. I didn't know what kind of tag I'd be able to find or make, at the time.
Several weeks later, I came across a pad of sticky notes that were the exact same boot design! It was one of those "meant to be" things.
I'm sorry I don't remember which cartridge I used for the "to" and "from" but there are many that have these cuts.

Closeup of tag.
Ornament

This bag uses very non-traditional colours so it was good that I was able to create a gift card that matched.
The blue is almost a baby blue. I started with a 6" x 3" piece of white cardstock, folded in half for a 3x3 card.
 I cut a square of blue for the front.
The ornament is from Christmas Cheer cut at about 2-1/2".
For this one I decided to use an eyelet for the cord to go through. It looks a lot more polished than to just have an empty hole.
And to make the tag match with the others on the bag, I added some glitter around the ornament.
Gift

These little cards are so simple and quick to make. When I look through my cartridges I see endless possibilities in Christmas designs.
Many cartridges have various gifts. This one is from Christmas Cheer because it best matches the gifts on the bag.

I rounded off the corners using a punch. I think this one is from Creative Memories.
Once again the card size is 3"x3". I inked around the edges in red to mimic the other gifts.
A punched hole and piece of red cording finish it off.
Subscribe to:
Posts
(Atom)
About Me

Subscribe To


 Posts
All Comments